Turn Your Dead Personal Blog Into a Tor WebTunnel in 5 Minutes
2024-05-13

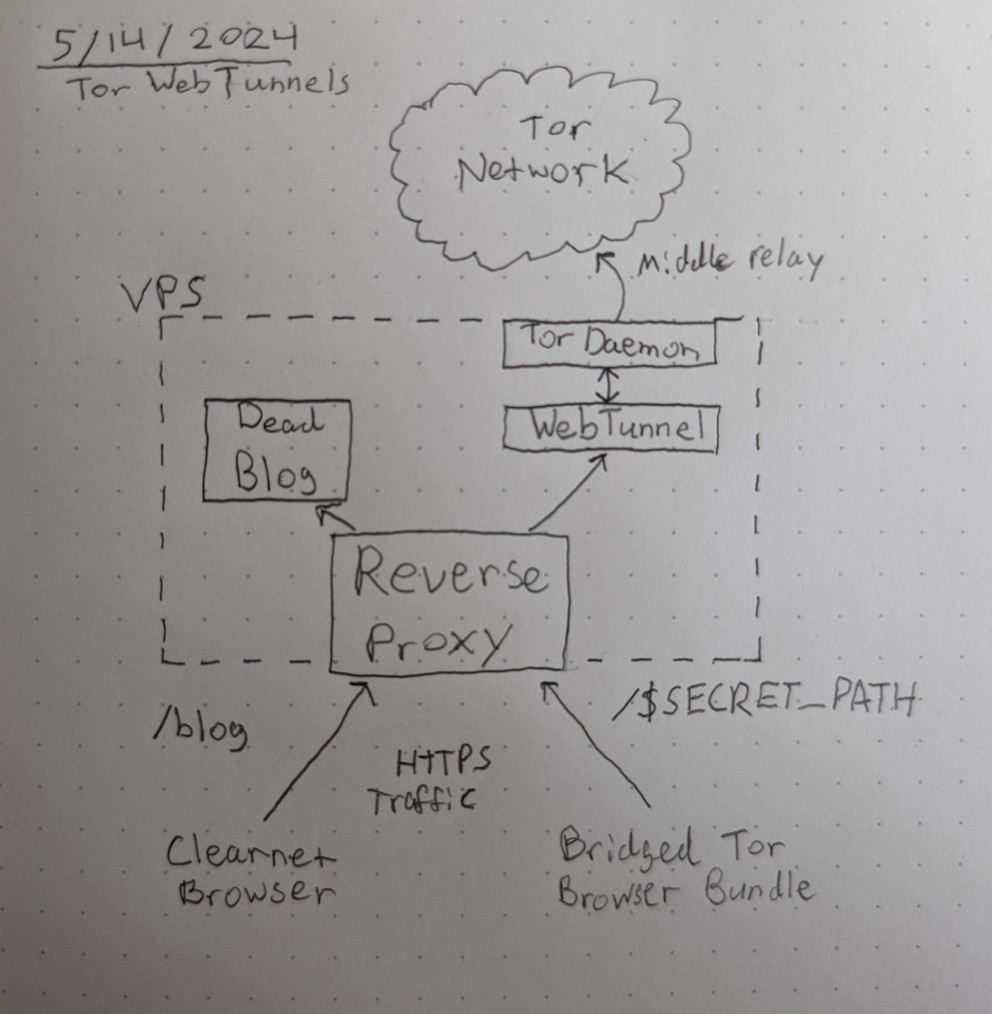
Like many people in the software world, I have a personal website that I have zero time to maintain. Outside of hosting a vanity email address and an old whitepaper, there's not a whole lot going on here. My VPS spends 99% of its cycles idling. The other 1% is probably being spent on serving drive-by WordPress vulnerability probes and crawl bots trawling for training data.
With just a few minutes of my time, I turned my dead website into something more productive: a censorship-busting gateway to the internet. This is possible thanks to the new Tor WebTunnel pluggable transport, which hides Tor bridge traffic behind your HTTP proxy of choice.
If you already know what Tor is and how it works, just skip to the good stuff to learn how to set up your WebTunnel bridge relay.
Tor Crash Course
Tor is a decentralized and volunteer-run network used to access the internet anonymously. Anyone can download the Tor Browser Bundle and have a reasonably secure and private link to the rest of the internet. A person's traffic gets bounced around three different relays, none of whom have a complete picture of what the user is doing thanks to the power of onion routing. Besides browsing the "clearnet", another thing you can use Tor for is for accessing onion services, which offer a number of interesting security properties. You can read this very post through an onion service.
Tor can't be accessed from some countries because of government censorship. By hosting a special kind of relay, you can help Tor's most vulnerable users gain access to the uncensored internet. Think of running a Tor Bridge as a type of volunteerism like Folding@Home. You give a bit of your expertise, CPU cycles, and bandwidth to make the world a slightly better place.
A full overview of how Tor works is outside of the scope of this post, but those interested in diving deeper should start with Ben Collier's excellent Tor: From the Dark Web to the Future of Privacy for an accessible history of the project.
Relays and Bridges
Relays are the backbone of the Tor network. Anybody, including you, can run a Tor relay. The more diverse the network becomes, the stronger the privacy guarantees become.
Hosting regular relays (guards, middle nodes, and exits) has some caveats, but pretty much anybody can safely run a bridge relay with minimal effort. A bridge is a special kind of relay that is hard for adversaries to block, and can even be safely hosted on a home network, if you're willing to spend some time wrestling with NAT. Now, with the latest pluggable transport introduced by the Tor project, it's possible to host a particularly difficult to block type of bridge with a garden-variety web server.
The New WebTunnel Pluggable Transport
Evading blocking is an unending arms race between censors and Tor developers. Pluggable transports are supplemental software that help relays disguise web traffic from censors. The newest one is called WebTunnel, and it works by proxying HTTPS-ified Tor traffic through your web server to the rest of the Tor network. If you have a web domain, a VPS, and an application server set up, you're essentially 90% finished setting up a WebTunnel relay already.
Set up your WebTunnel in 5 minutes
I'm writing this under the assumption that you have a domain, a VPS, and a web server serving HTTPS responses to the internet at your disposal. If you're starting from scratch, you need to read the official documentation instead.
Here's what you need to do:
- Generate a random string.
- Configure your web server to route traffic to the WebTunnel port.
- Install and configure WebTunnel and Tor on your VPS.
- Read the server logs and fix any mistakes you made.
Be sure to have automated security updates turned on as well.
This guide is written for any apt-based Linux distribution, but can be trivially adapted to work on any web server on any Unix-like.
1. Generate a random string.
Your tunnel hides behind a reasonably long random path string on your web server. Run this command to generate an eligible string:
echo $(cat /dev/urandom \
  |tr -cd "qwertyuiopasdfghjklzxcvbnmMNBVCXZLKJHGFDSAQWERTUIOP0987654321" \
  |head -c 24)
2. Configure your web server to route traffic to the WebTunnel port.
Now, we're going to take that random string we generated and configure our web server to use it as a path. I happen to use nginx, but if you don't, you can figure out how to route a request to localhost:15000 on your own HTTPS-enabled webserver easily enough.
Let's create a new virtual host for serving WebTunnel users. Paste this in /etc/nginx/sites-available/webtunnel-vhost. You will need to customize ssl_certificate, ssl_certificate_key, and the location line.
- Change
ssl_certificateandssl_certificate_keyto point to your existing SSL key. If you use Let's Encrypt, it will look similar to what I have below. - On the
locationline, change$YOUR_RANDOM_STRINGto the random string you generated in step 1.
server {
    listen [::]:443 ssl http2;
    listen 443 ssl http2;
    server_name $SERVER_ADDRESS;
    #ssl on;

    # certificates generated via acme.sh
    ssl_certificate /etc/letsencrypt/live/your.site/fullchain.pem; # managed by Certbot
    ssl_certificate_key /etc/letsencrypt/live/your.site/privkey.pem; # managed by Certbot

    ssl_session_timeout 15m;

    ssl_protocols TLSv1.2 TLSv1.3;

    ssl_ciphers ECDHE-ECDSA-AES128-GCM-SHA256
                :ECDHE-RSA-AES128-GCM-SHA256
                :ECDHE-ECDSA-AES256-GCM-SHA384
                :ECDHE-RSA-AES256-GCM-SHA384
                :ECDHE-ECDSA-CHACHA20-POLY1305
                :ECDHE-RSA-CHACHA20-POLY1305
                :DHE-RSA-AES128-GCM-SHA256
                :DHE-RSA-AES256-GCM-SHA384;

    ssl_prefer_server_ciphers off;

    ssl_session_cache shared:MozSSL:50m;
    #ssl_ecdh_curve secp521r1,prime256v1,secp384r1;
    ssl_session_tickets off;

    add_header Strict-Transport-Security "max-age=63072000" always;

    location = /$YOUR_RANDOM_STRING {
        proxy_pass http://127.0.0.1:15000;
        proxy_http_version 1.1;

        ### Set WebSocket headers ###
        proxy_set_header Upgrade $http_upgrade;
        proxy_set_header Connection "upgrade";

        ### Set Proxy headers ###
        proxy_set_header        Accept-Encoding   "";
        proxy_set_header        Host            $host;
        proxy_set_header        X-Real-IP       $remote_addr;
        proxy_set_header        X-Forwarded-For $proxy_add_x_forwarded_for;
        proxy_set_header        X-Forwarded-Proto $scheme;
        add_header              Front-End-Https   on;

        proxy_redirect     off;
        access_log  off;
        error_log off;
    }
}
Enable the virtual host and test your configuration.
sudo ln -s /etc/nginx/sites-available/webtunnel-vhost /etc/nginx/sites-enabled/
sudo nginx -t
sudo systemctl reload nginx
3. Install and configure WebTunnel and Tor on your VPS.
You have two choices for installing WebTunnel: compiling from source, or installing from Docker. I don't want to deal with setting up Docker on my server, and compiling Golang is super easy, so we're going to install from source.
sudo apt install golang
cd /tmp/
git clone https://gitlab.torproject.org/tpo/anti-censorship/pluggable-transports/webtunnel
cd webtunnel/main/server
go build
sudo cp server /usr/local/bin/webtunnel
Next, we need to install Tor through your package manager. To ensure you're using a bleeding-edge version of Tor, the Tor developers recommend that you use their repositories.
# Add Tor repositories
CODENAME=$(lsb_release -cs)
cat <<EOF > /etc/apt/sources.list.d/tor.list
   deb     [signed-by=/usr/share/keyrings/tor-archive-keyring.gpg] https://deb.torproject.org/torproject.org $CODENAME main
   deb-src [signed-by=/usr/share/keyrings/tor-archive-keyring.gpg] https://deb.torproject.org/torproject.org $CODENAME main
EOF

# Import Tor developers' package signing key
wget -qO- https://deb.torproject.org/torproject.org/A3C4F0F979CAA22CDBA8F512EE8CBC9E886DDD89.asc \
    | gpg --dearmor | sudo tee /usr/share/keyrings/tor-archive-keyring.gpg >/dev/null

# Install Tor
sudo apt update && sudo apt install tor deb.torproject.org-keyring -y
Let's configure the Tor daemon to run in relay mode. Replace /etc/tor/torrc with the following:
ORPort 127.0.0.1:auto
AssumeReachable 1
ServerTransportPlugin webtunnel exec /usr/local/bin/webtunnel
ServerTransportListenAddr webtunnel 127.0.0.1:15000
Log notice file /var/log/tor/notices.log
ExtORPort auto
SocksPort 0
BridgeRelay 1

ContactInfo <address@email.com>
ServerTransportOptions webtunnel url=https://your.site/$YOUR_RANDOM_STRING
Nickname $YOUR_RELAY_NICKNAME
Pay special attention to the last three lines, which you need to customize.
- ContactInfo: Your email address. This is public information. Consider using an inbox dedicated to relay operation.
- ServerTransportOptions: You need to change this to point to your domain and random path string.
- Nickname: A fun name for identifying your bridge.
AppArmor settings
Finally, we need to allow WebTunnel to inherit capabilities from the Tor daemon. This is achieved using the Inherit Execute (ix) access mode in the Tor AppArmor profile.
Open /etc/apparmor.d/system_tor and add the access mode /usr/local/bin/webtunnel ix, to the system_tor profile inside of the curly braces. Use my settings as a reference (avoid copying and pasting it; there might be upstream changes).
. . .
   # WebTunnel-specific access mode
  /usr/local/bin/webtunnel ix,
. . .
Once you've made the change, reload the system_tor AppArmor profile.
sudo apparmor_parser -r /etc/apparmor.d/system_tor
4. Start the Tor daemon and monitor the logs.
# Start Tor
sudo systemctl enable --now tor.service
# Tail the logs and make sure the server starts successfully
sudo journalctl -e -u tor@default --follow
If you see a message saying your server has been fully bootstrapped, you're done. If you're stuck, I recommend referring to the full how-to guide on the Tor website for additional support.
That's it!
In a few days, your server fingerprint will be distributed to users of the Tor network, and traffic will start flowing in.
Ideally, to make it harder to categorize and block your site, you won't announce your WebTunnel to the world like I did. In addition to torifying https://alden.page, I've started up bridge relays on a handful of other servers that I own as well.
✉️ Contact the author Subscribe to RSS feed